Prism PubSubEventを簡単に
GetEventとか長ったらしい。
おもむろに以下のクラスを実装しましょう。
using Prism.Events;
using System;

namespace Hoge
{
    public abstract class StaticPubSubEvent<T> : PubSubEvent where T : StaticPubSubEvent<T>, new()
    {
        private static EventAggregator eventAggregator = new EventAggregator();

        private static readonly T instance = eventAggregator.GetEvent<T>();

        protected StaticPubSubEvent() { }

        public static new void Publish() => eventAggregator.GetEvent<T>().InternalPublish();

        public static new SubscriptionToken Subscribe(Action action) => Subscribe(action, ThreadOption.PublisherThread);

        public static new SubscriptionToken Subscribe(Action action, ThreadOption threadOption) => Subscribe(action, threadOption, false);

        public static new SubscriptionToken Subscribe(Action action, bool keepSubscriberReferenceAlive) => Subscribe(action, ThreadOption.PublisherThread, keepSubscriberReferenceAlive);

        public static new SubscriptionToken Subscribe(Action action, ThreadOption threadOption, bool keepSubscriberReferenceAlive)
        {
            var actionReference = new DelegateReference(action, keepSubscriberReferenceAlive);

            EventSubscription subscription;
            switch (threadOption)
            {
                case ThreadOption.PublisherThread:
                    subscription = new EventSubscription(actionReference);
                    break;
                case ThreadOption.BackgroundThread:
                    subscription = new BackgroundEventSubscription(actionReference);
                    break;
                case ThreadOption.UIThread:
                    if (instance.SynchronizationContext == null) throw new InvalidOperationException();
                    subscription = new DispatcherEventSubscription(actionReference, instance.SynchronizationContext);
                    break;
                default:
                    subscription = new EventSubscription(actionReference);
                    break;
            }

            return eventAggregator.GetEvent<T>().InternalSubscribe(subscription);
        }
    }
}
で、イベントクラスを用意
namespace Hoge
{
    public sealed class HogeEvent : StaticPubSubEvent<HogeEvent> { }
}
Subscriber
HogeEvent.Subscribe(() =>
{
}, ThreadOption.UIThread);
Publisher
HogeEvent.Publish();
ぼくは気にしないけど、若干いまいちですね。何がいまいちかわかる人だけ自己責任で使ってくださいw(ヒント:EventAggregator
Enum Radio Button Binding
WPFのMVVMは好きです。他の言語で似非MVVM書いてるとなんだかなーって思う。
が、やっぱりWPFは嫌いです。
はい。EnumをBindingしたいとき。
まずおもむろにEnumの拡張を用意しましょう。このブログでも出てきたと思いますよー。
public static class EnumEx
{
    public static string StringValue(this Enum e)
    {
        var fieldInfo = e.GetType().GetField(e.ToString());
        var attribute = (StringValueAttribute)fieldInfo.GetCustomAttributes(typeof(StringValueAttribute), false).FirstOrDefault();
        return attribute == null ? null : attribute.StringValue;
    }
}
次にConverterを2つ用意しましょう。
using System;
using System.Globalization;
using System.Windows.Data;

namespace Hoge
{
    [ValueConversion(typeof(Enum), typeof(bool))]
    public class EnumToRadioButtonConverter : IValueConverter
    {
        public object Convert(object value, Type targetType, object parameter, CultureInfo culture)
        {
            return value.Equals(Enum.Parse(value.GetType(), parameter.ToString()));
        }

        public object ConvertBack(object value, Type targetType, object parameter, CultureInfo culture)
        {
            if (!(bool)value)
                return Binding.DoNothing;
            return Enum.Parse(targetType, parameter.ToString());
        }
    }
}
using System;
using System.Globalization;
using System.Windows.Data;

namespace Hoge
{
    [ValueConversion(typeof(Enum), typeof(string))]
    public class EnumToStringConverter : IValueConverter
    {
        public object Convert(object value, Type targetType, object parameter, CultureInfo culture)
        {
            return (Enum.Parse(value.GetType(), parameter.ToString()) as Enum).StringValue();
        }

        public object ConvertBack(object value, Type targetType, object parameter, CultureInfo culture)
        {
            if (!(bool)value)
                return Binding.DoNothing;
            return Enum.Parse(targetType, parameter.ToString());
        }
    }
}
んで、enumとViewModel。双方向は省略。INotifyPropertyChangedを実装してくだされ。
namespace Hoge
{
    public enum Gender
    {
        [StringValue("男性")]
        Male,
        [StringValue("女性")]
        Female
    }

    public sealed class HogeViewModel
    {
        public Gender Gender { get; set; }
    }
}
で、View
<Page x:Class="Hoge.SamplePage"
            xmlns="http://schemas.microsoft.com/winfx/2006/xaml/presentation"
            xmlns:d="http://schemas.microsoft.com/expression/blend/2008"
            xmlns:mc="http://schemas.openxmlformats.org/markup-compatibility/2006"
            xmlns:local="clr-namespace:Hoge"
            mc:Ignorable="d"
            d:DesignHeight="500" d:DesignWidth="300">
    <Page.DataContext>
        <local:HogeViewModel x:Name="viewModel" />
    </Page.DataContext>
    <Page.Resources>
        <local:EnumToRadioButtonConverter x:Key="EnumToRadioButton"/>
        <local:EnumToStringConverter x:Key="EnumToString"/>
    </Page.Resources>
    <Grid>
        <StackPanel Orientation="Horizontal">
            <RadioButton GroupName="Gender"
                 Content="{Binding Gender, ConverterParameter=Male, Converter={StaticResource EnumToString}}"
                 IsChecked="{Binding Gender, ConverterParameter=Male, Converter={StaticResource EnumToRadioButton}}"/>
            <RadioButton GroupName="Gender"
                 Content="{Binding Gender, ConverterParameter=Female, Converter={StaticResource EnumToString}}"
                 IsChecked="{Binding Gender, ConverterParameter=Female, Converter={StaticResource EnumToRadioButton}}"/>
        </StackPanel>
    </Grid>
</base:BasePage>
Windowsタスクトレイ常駐型のアプリを作る(WPF版)
よく作るんですけどね。忘れるよね。
なお、ググるキーワードはNotifyIcon。
Component作成
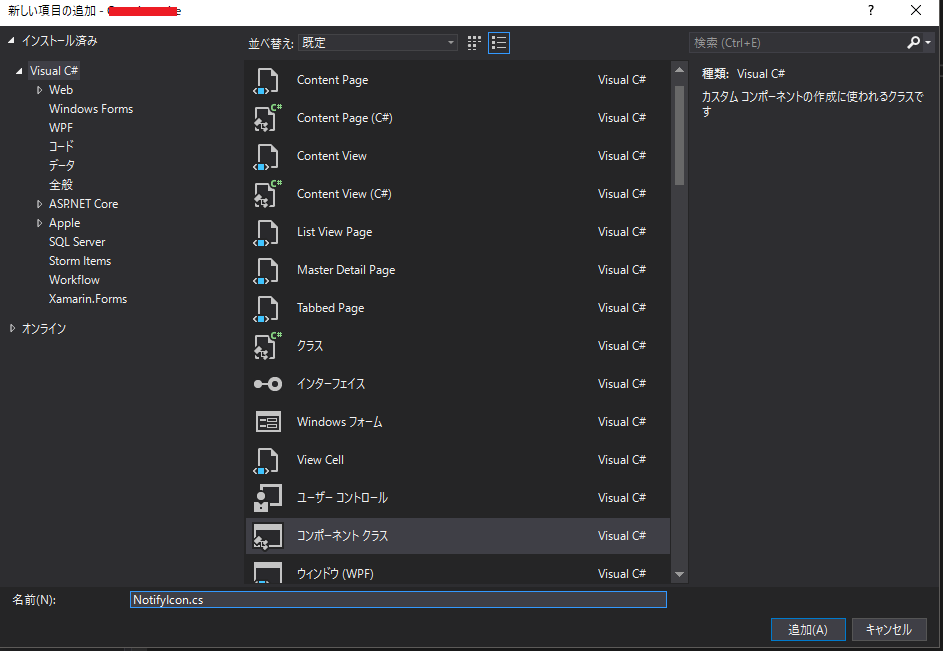
Componentsフォルダを作って、右クリック→「追加」→「新しい項目」
「コンポーネントクラス」を探し出して、お好きな名前をつけて追加しましょう。
ここでは「NotifyIcon」としました。

NotifyIconクラスの編集
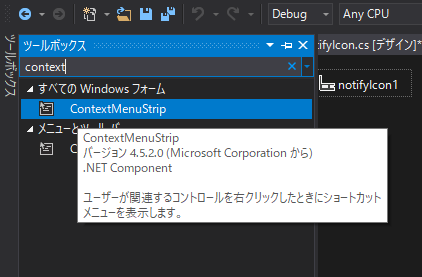
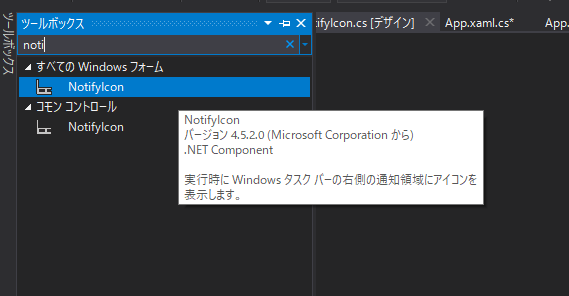
ツールボックスから「ContextMenuStrip」と「NotifyIcon」を追加します。
ツールボックスで検索して、ドラッグ&ドロップで持っていきましょう。
デフォルトの名前が嫌なので変えましたよ。
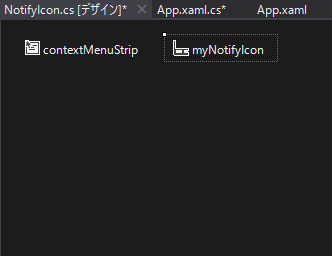
contextMenuStripの設定
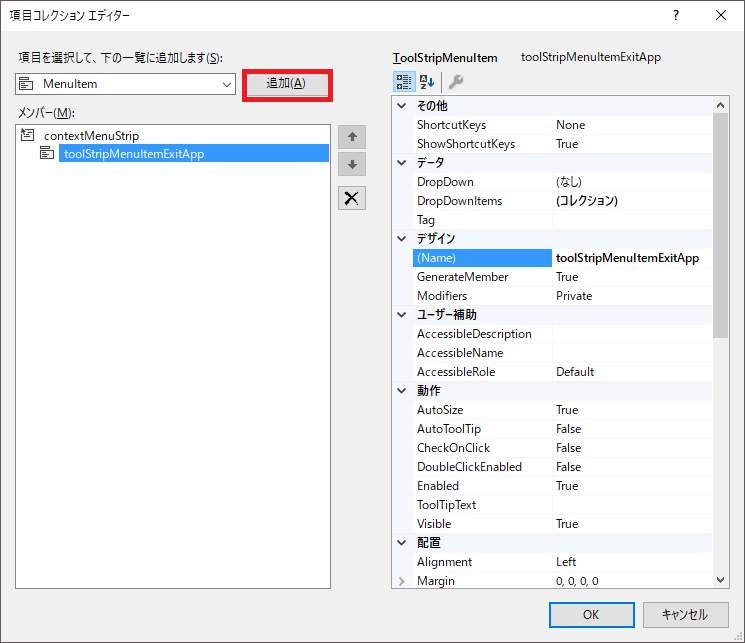
contextMenuStripを右クリックで「項目の編集」

MenuItemを追加
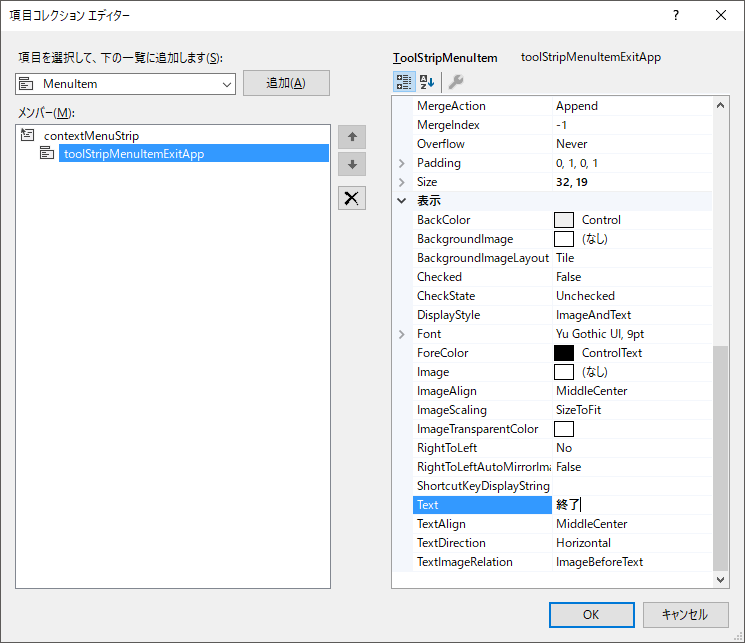
「デザイン」→「(Name)」と「表示」→「Text」を編集
Nameはご自由に。Textはタスクトレイのアイコンを右クリックしたときに出るメニューに表示されますよ。
myNotifyIconの編集
プロパティを開いて、ContextMenuStripとIconを設定

NotifyIcon.csの編集
終了メニュークリックしたらアプリケーションを終了。
using System;
using System.ComponentModel;
using System.Windows;

namespace Hoge.Components
{
    public partial class NotifyIcon : Component
    {
        public NotifyIcon()
        {
            InitializeComponent();
            toolStripMenuItemExitApp.Click += delegate (object sender, EventArgs e)
            {
                Application.Current.Shutdown();
            };
        }

        public NotifyIcon(IContainer container)
        {
            container.Add(this);

            InitializeComponent();
        }
    }
}
App.xamlの編集
App.xaml.csのほうから
using Hoge.Components;
using System.Windows;

namespace Hoge
{
    /// <summary>
    /// App.xaml の相互作用ロジック
    /// </summary>
    public partial class App : Application
    {
        private NotifyIcon notifyIcon = new NotifyIcon();

        protected override void OnStartup(StartupEventArgs e)
        {
            base.OnStartup(e);
            ShutdownMode = ShutdownMode.OnExplicitShutdown;
        }

        protected override void OnExit(ExitEventArgs e)
        {
            base.OnExit(e);
            notifyIcon.Dispose();
        }
    }
}
んで、App.xaml
StartupUri="MainWindow.xaml"って記載があるので削除しましょう。
<Application x:Class="Questionnaire.App"
             xmlns="http://schemas.microsoft.com/winfx/2006/xaml/presentation"
             xmlns:x="http://schemas.microsoft.com/winfx/2006/xaml"
             xmlns:local="clr-namespace:Hoge">
    <Application.Resources>

    </Application.Resources>
</Application>
Windowsインストーラーの作成
2018年最新版!
Visual Studio2017向け!ぼくはVisual Studio Community 2017だよ!
既存のソリューションにインストーラープロジェクトを追加するよ!最近C#ばっかだよ!
作成
Visual Studioを起動。インストーラーを追加したいソリューションを開いてね!
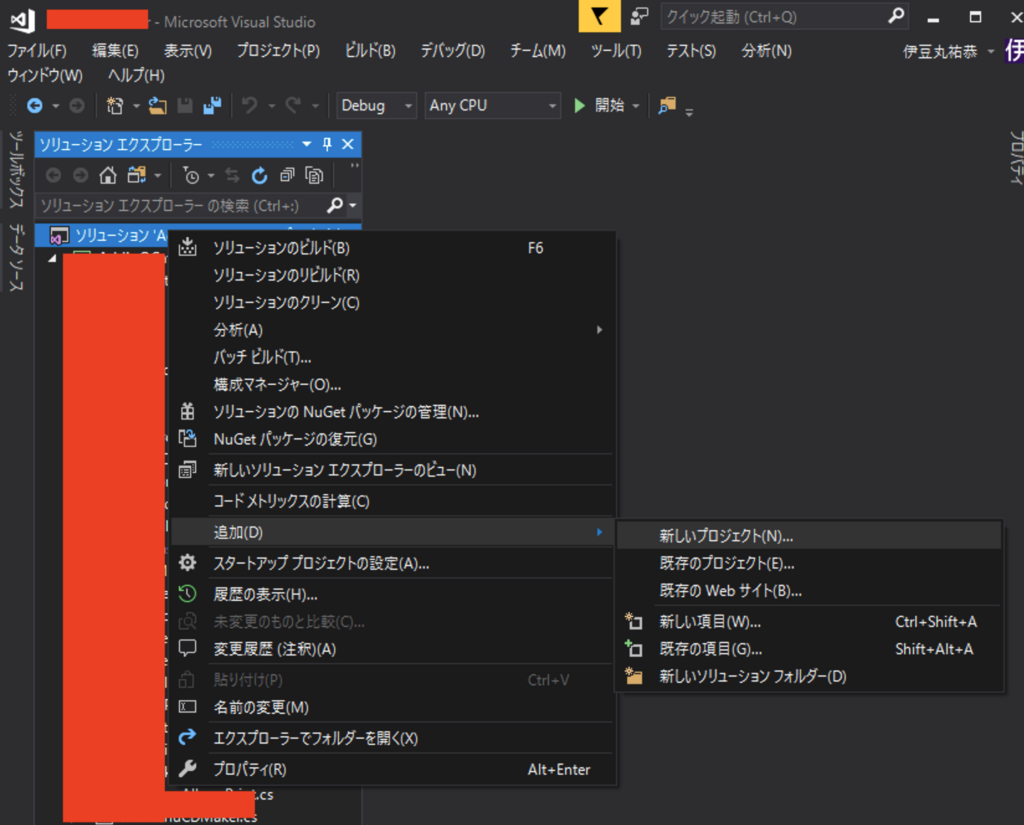
ソリューションを右クリックで「追加」→「新しいプロジェクト」
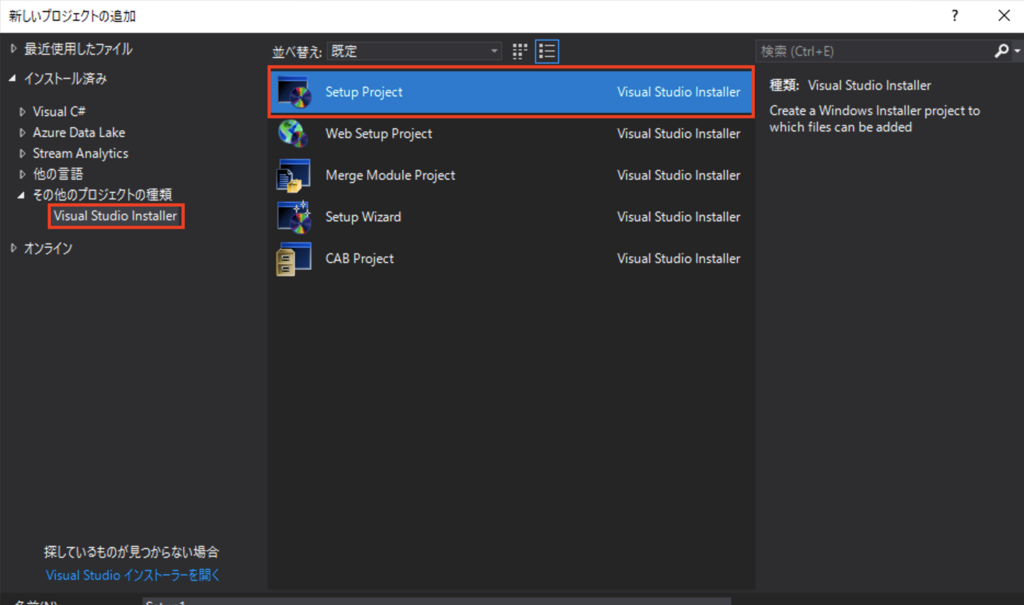
「インストール済み」→「その他のプロジェクトの種類」→「Setup Project」で名前をつけて「OK」
インストールするファイルの指定
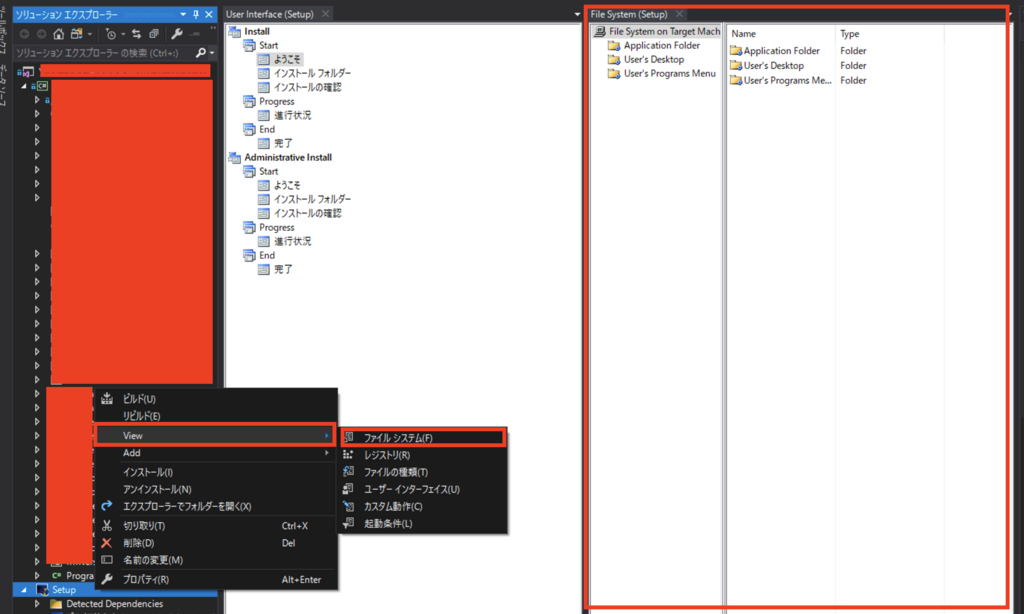
追加されたプロジェクトを右クリックで「View」→「ファイルシステム」
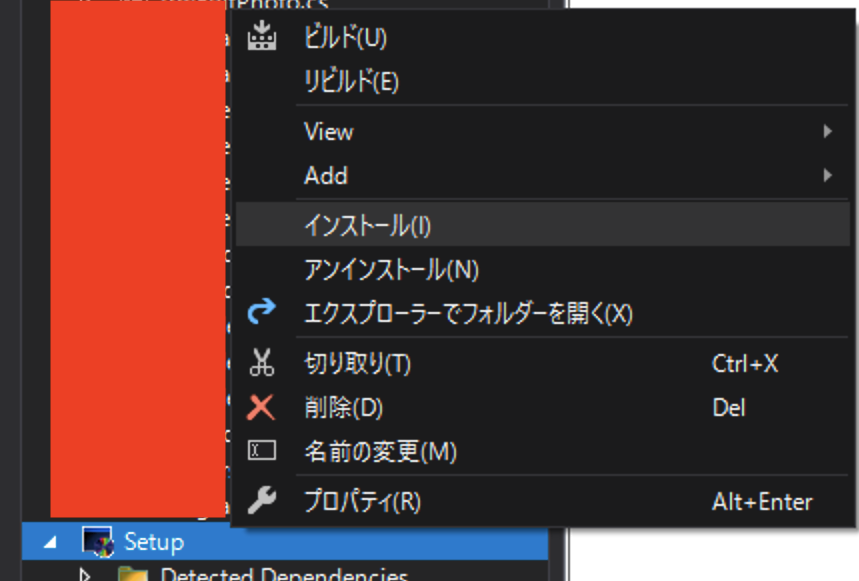
ちなみに「インストール」「アンインストール」からインストーラーとあんインストーラーが起動できるよ!

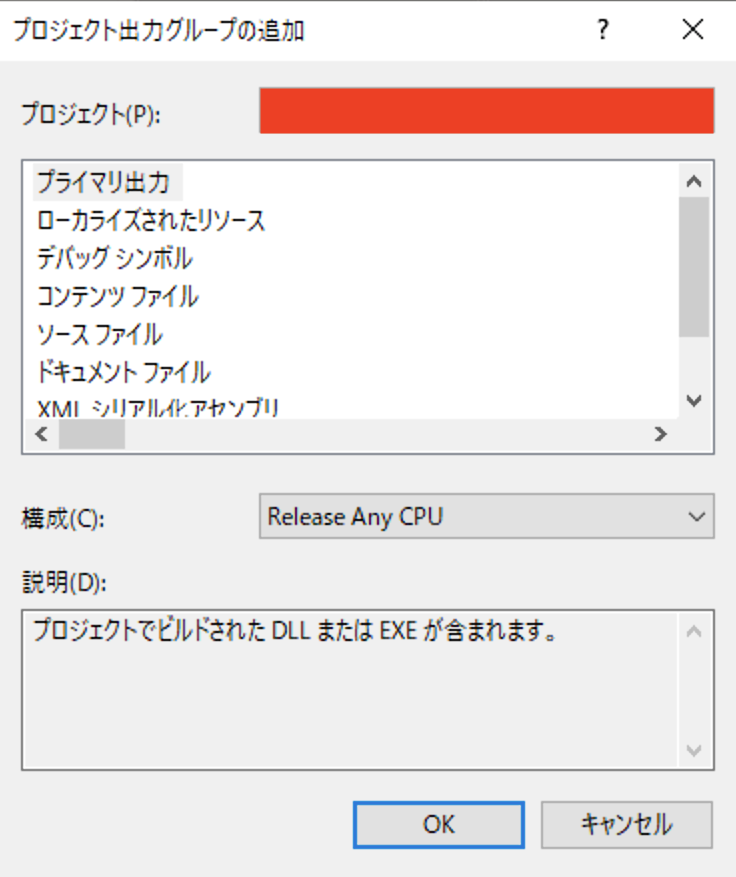
単純なものだったら「Application Folder」を右クリック→「Add」→「プロジェクト出力」でexeとかDLLが追加できるよ!
よその記事見るとインストーラービルド時に構成を切り替えてーとかやってたけど、インストーラーなんてここでRelease Any CPUにしとけばいいと思うよ!
インストーラー設定
必要最低限。セットアッププロジェクトのプロパティね。
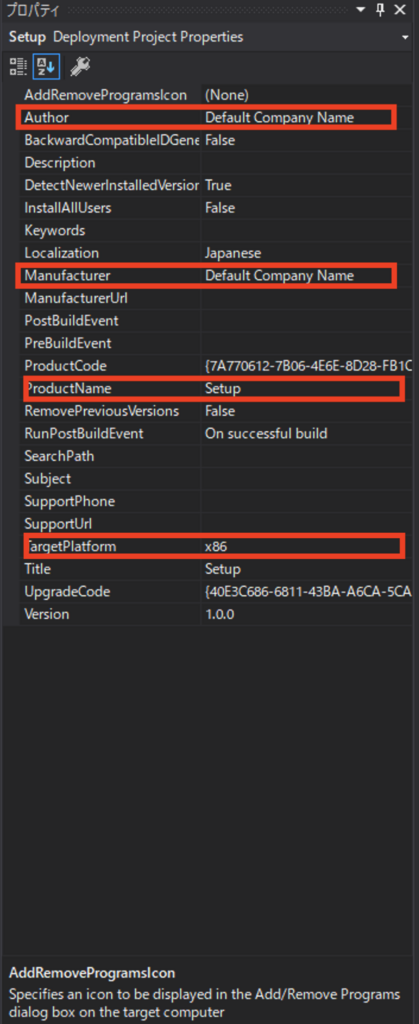
Author→お名前を書きましょう
Manufacturer・ProductName→C:¥Program Files¥[Manufacturer]¥[ProductName]にデフォルトでインストールされるよ!
TargetPlatform→ちゃんと合わせようね!
Docker環境構築(Rails)②
devdevdev.hatenablog.com
基礎編はこちら
前回作ったコンテナ上にrailsの実行環境を作っていきますよー
ホスト側は一切汚しません。
とりあえずね
$ docker-compose run app bundle init
app/Gemfileが生成されるよ
Gemfileを編集
デフォルトはこう
# frozen_string_literal: true

source "https://rubygems.org"

git_source(:github) {|repo_name| "https://github.com/#{repo_name}" }

# gem "rails"
最後の行を以下のように書き換えます
gem 'rails', '5.1.4'
docker-compose.ymlの編集
appの下に以下を追記
    environment:
      RAILS_ENV: development
app / volumesの下に以下を追記
- bundle:/usr/local/bundle
appの一番下に以下を追記
command: /bin/sh -c 'mkdir -p tmp/sockets/ && bundle exec puma -C config/puma.rb'
一番下に以下を追記
volumes:
  bundle:
Dockerfileの編集
docker/app/Dockerfileに以下を追記
RUN apt-get update && apt-get install -y nodejs

ADD ./app/Gemfile* $APP_ROOT/
RUN bundle install
ビルド
$ docker-compose build
railsアプリケーション作成
appにsshではいる
$ docker-compose run app bash
普通に作る
$ rails new . -d mysql
Gemfileを上書きしていいか聞かれるので「Y」
app/config/database.yml書き換え
development:
  password: password
app/config/puma.rbに以下を追記
app_root = File.expand_path("../..", __FILE__)
bind "unix://#{app_root}/tmp/sockets/puma.sock"
ビルドして起動
$ docker-compose build
$ docker-compose up
http://localhost/にアクセスしてrailsの画面が表示されればおk。
Docker環境構築(Rails)①
入門~インストールはこちら
devdevdev.hatenablog.com
DockerとDocker-Compose
Dockerはコンテナの管理
Dockerfileで色々管理
Docker-Composeは複数のコンテナの管理
docker-compose.ymlで色々管理
Docker-Composeで環境を作るコンテナの内容によってはDockerfileは不要
くらいに覚えておけば十分かと。
構築する環境
App(Ruby 2.5.1) - アプリケーションサーバー
MySQL 5.7.21 - DB
Nginx 1.13.10 - Webサーバー
phpMyAdmin - 何かと便利
Redis 3.2.11 - KVS
ファイル構成
- app/
- docker-compose.yml
- docker/
    - app/
        - Dockerfile
    - mysql/
        - conf.d/
            - custom.cnf
    - nginx/
        - app.conf
docker/配下のファイルの用意
App
Dockerfileを用意
FROM ruby:2.5.1

ENV APP_ROOT /var/www/app
WORKDIR $APP_ROOT
MySQL
Dockerfileは不要。
mysql/conf.d/custom.cnfを用意しましょう。
[client]
default-character-set=utf8

[mysqld]
character-set-server=utf8

[mysqld_safe]
timezone = UTC
Nginx
Dockerfileは不要
nginx/app.confを用意しましょう。
server {
    listen 80 default_server;
    index index.php index.html index.htm;
    root /var/www/app;
}
phpMyAdmin
Dockerfileも何もいりません。
Redis
Dockerfileも何もいりません。
docker-compose.ymlの作成
version: '2'
services:
  app:
    build:
      context: .
      dockerfile: ./docker/app/Dockerfile
    volumes:
      - ./app:/var/www/app
    ports:
      - 3000:3000
    depends_on:
      - mysql
      - redis
  mysql:
    image: mysql:5.7.21
    environment:
      MYSQL_ROOT_PASSWORD: password
      MYSQL_DATABASE: app
    ports:
      - 3306:3306
    volumes:
      - ./docker/mysql:/etc/mysql/conf.d
  nginx:
    image: nginx:1.13.10
    ports:
      - 80:80
    volumes_from:
      - app
    volumes:
      - ./app:/var/www/app
      - ./docker/nginx:/etc/nginx/conf.d
    depends_on:
      - app
  phpmyadmin:
    image: phpmyadmin/phpmyadmin
    environment:
      - PMA_ARBITRARY=1
      - PMA_HOST=mysql
      - PMA_USER=root
      - PMA_PASSWORD=password
    links:
      - mysql
    ports:
       - 8080:80
  redis:
    image: redis:3.2.11
起動してみる
$ docker-compose up
・エラーが表示されない
・http://localhost/にアクセスしてNginxの404が表示される
・http://localhost:8080/にアクセスしてphpMyAdminが表示される
のが確認できれば完了。停止はControl + cで。
アプリケーションの用意は次回やります。
Trouble shooting
ERROR: for mysql Cannot start service mysql: b'Mounts denied: ~
ファイルを作った場所によってはこんなエラーが出る場合があります。
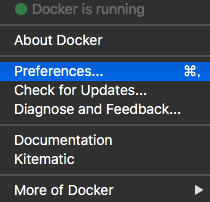
右上のクジラアイコンをクリックして、「Preferences」
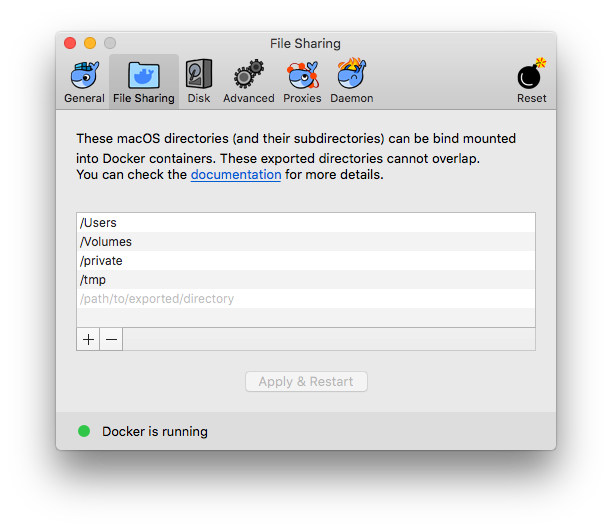
「File Sharing」でdocker-compose.ymlがある場所を追加しましょう。
終わったら「Apply & Restart」してしばらく待ちましょう。
Docker入門~インストール
そういえば書いてなかった気がする&人に説明するので、筆を取ることにしました。
入門
Dockerとは
コンテナ仮想化ツール
簡単に言うとPC上にWebサーバーとか、DBサーバーとかを一つにまとめた環境をポンと構築できるよってやつ。
Vagrantとかは1台の仮想マシンに1マシンになるので、WebサーバーとDBサーバーを立てようと思ったら2つ必要になるのが大きな違いかな。
Dockerを使うメリット
本番環境と同じ環境を簡単に用意できる。
なんならそのまま本番環境に使えるらしい。
起動とか処理が早い。
軽い。
コマンドを叩くだけで環境構築完了!
Docker用語
・イメージ:コンテナの元となるもの。EC2でいうAMI。Docker Hubというところにある。
・コンテナ:イメージを元に作られたもの。ここに各プロジェクト用の情報などが設定される。EC2でいうインスタンス。
インストール
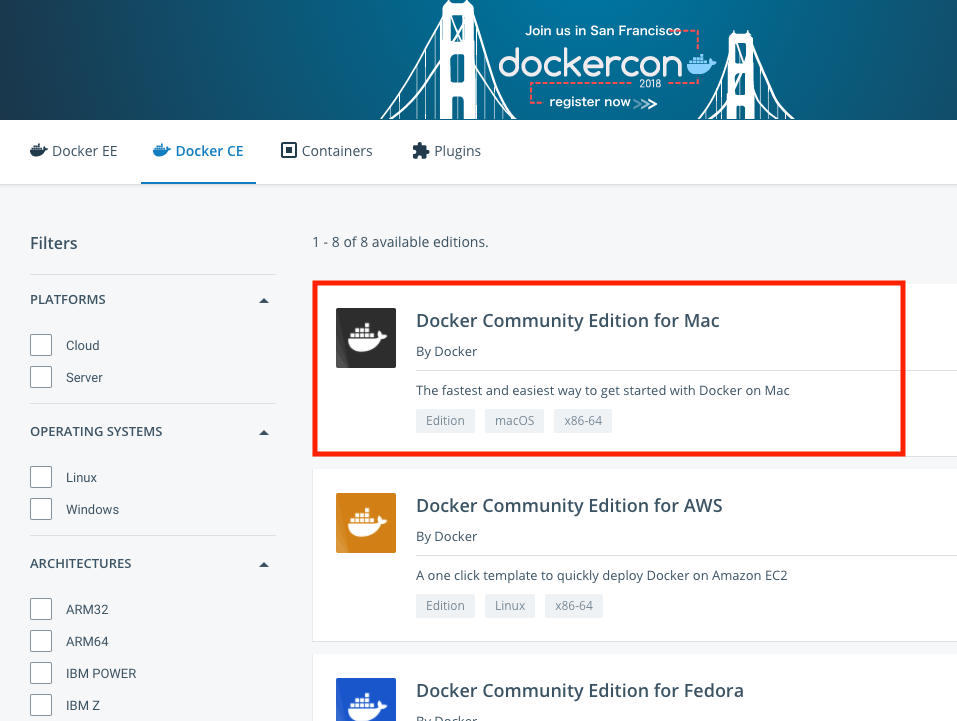
Docker Store
から「Docker Community Edition for Mac」をダウンロードしましょう。

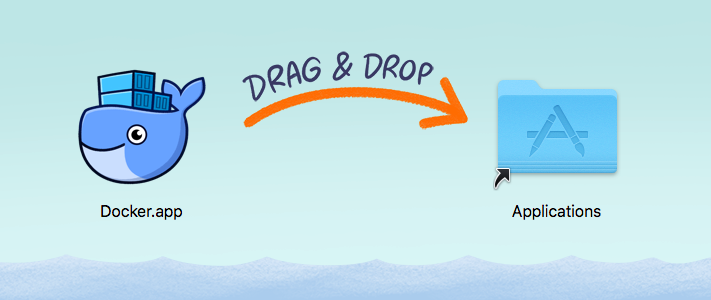
ダウンロードした「Docker.dmg」をダブルクリックして開きましょう。
書いてあるとおりにドラッグ&ドロップすれば完了!
